


Hi all! For my first tutorial on CakeJournal I thought it would be useful to show you how to make a face mold from a doll. Of course, you can buy molds but some are quite expensive. Instead, you can easily make a mold with just gum paste, tylose powder, shortening and a doll head.
Here’s what I used:
For the mold…
Gum paste
Tylose powder
Shortening
Doll – needs to be quite a firm one
For the finished and decorated fondant head…
Fondant in skin tone for head
Fondant in white for the eyes
Fondant in blue for the eyes
Tylose powder
Rolling pin
Circle cutter
Gum paste tools
Small paint brush
Edible ink pen
Pink petal dust
Red or pink food colouring
Half teaspoon of pure alcohol (such as vodka or gin) or lemon extract

Making the mold, Step 1.
Knead a small handful of gum paste to soften it. Add approximately 2 teaspoons of tylose powder and knead well into the gum paste. The powder makes the gum paste extra hard once dried.

Making the mold, Step 2.
Shape it into a ball. Make sure one side of your gum paste, where you will place the doll face, is crease free.

Making the mold, Step 3.
Flatten the ball slightly.

Making the mold, Step 4.
Rub some shortening onto the doll face. You may like to protect the hair with cling film if you like, but you can just wash the shortening off afterwards.

Making the mold, Step 5.
Press the doll face onto the smooth surface of the gum paste. This works well if you cup the gum paste in the palm of your hand. Leave the mold (with doll still inside) to dry overnight. Then remove doll and allow it to dry for another day.

Finished face mold

Making doll head, Step 1.
Rub a little shortening in the mold. Roll your skin tone fondant into a ball for the head, slightly larger than the mold face. You should add tylose powder to the fondant for the head to harden it a little – just like in the fairy tutorial.

Making doll head, Step 2.
Press the fondant into the mold, firm enough to ensure an imprint.

Making doll head, Step 3.
Gently remove the fondant from the mold and re shape the back of head and face edges. You can use a bit of shortening to smooth out any wrinkles.

Making doll head, Step 4.
If you feel that the imprint is not strong enough, use the gum paste tool to define the features. You may like to pay particular attention to the nose (two small dots for nostrils) and the lip edges.
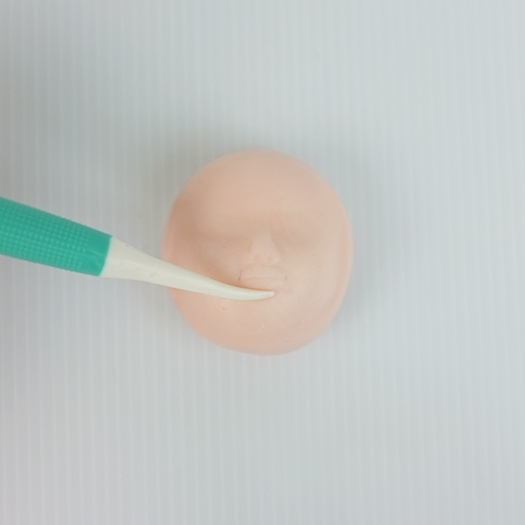
Making doll head, Step 5.
Roll two small balls of white fondant or the whites of the eyes. To make the balls stick to the face, use a very tiny bit of water applied with a brush.
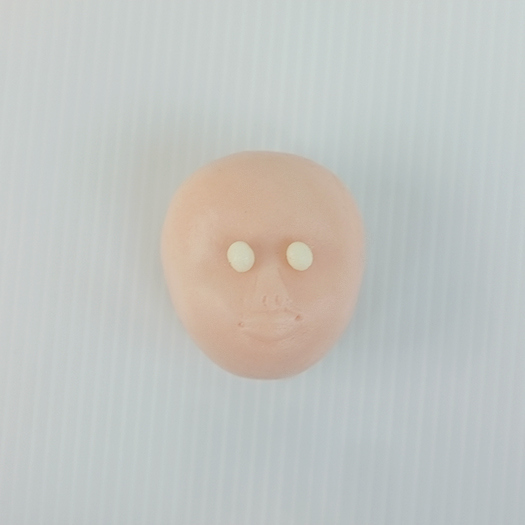
Making doll head, Step 6.
Use the gum paste tool to flatten and shape the eyes.

Making doll head, Step 7.
Roll two small balls of blue (or other colour) fondant for the irises. Use a gum paste tool to flatten into the white fondant. At this point, you may like to allow the head to dry for an hour or so to make painting and drawing the features easier.

Making doll head, Step 8.
Draw the eyebrows with the edible ink pen. This can be tricky, but you can usually gently wipe off any mistakes with a wet wipe.

Making doll head, Step 9.
For the lips, mix a little red or pink food colouring with half a teaspoon of pure alcohol like gin or vodka.

Making doll head, Step 10.
Paint on the lips, using a small paintbrush. This can also be tricky! I’m still trying to master this.
Draw the eyeslashes and the pupils. Create the catchlight in the eyes with tiny balls of white fondant.
Use a paintbrish and pink petal dust to give the cheeks some blush.

Making the doll head, Step 11.
Stick a toothpick in at the bottom of the head if you are attaching it to a body. This is best done before the gum paste is completely dry.

Making the doll head, Step 12.
For the hair, roll a thin piece of black fondant. Cut a circle out with a cutter.

Making the doll head, Step 13.
Paint a thin layer of water to the black fondant to adhere it to the back of the doll head.
Please circle on the back of the doll head and shape the edges to frame the doll face.
Curls are created by pressing parts of the edges together and shaping into place.
Decorate with a flower or bow for extra girly effect!


Your mold will be very versatile and can be made to suit many different characters. You can use it for both genders by changing the features and hairstyle. I hope you enjoyed my first tutorial! Would love to hear how you go with it.
Happy Caking!


0 comments:
Post a Comment